Thursday, February 28, 2013

A Taste of Exotic

I decided that I need to try more things. Foods specifically. I'm going to start cooking more, making a larger variety of foods, and trying new recipes. As a sort of kick-off to this new resolution, I went out and bought some of the weirdest fruits at the grocery store to try.

I chose three different kinds.


                                         1. Rambutan
Clearly a very strange looking fruit. Just wait. 
Opening this fruit is actually really easy. You just find the seam..
..and pop it open.
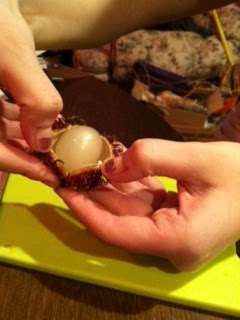
I think it looks like an eyeball inside, and there's very little flavor to it. My mom thought it just tasted like a peeled grape.
There's a big seed inside, so watch out when you bite into it.

2. Star Fruit
Now I'm sure you must have heard of this one. It's not quite uncommon, but I'd never tried one before.
To cut it, first you cut the green (or sometimes brown) edges off of each point of the star.
Then you just slice it up into little star slices.
Make sure you pick the seeds out.
This one was by far my favorite of the three that I tried.

3. Prickly Pear
This is literally the fruit from a cactus, and definitely the most annoying to prepare. 
I would recommend wearing gloves when you cut this. Though it may not look very cactus-like, there are tiny invisible needles that get in under your skin. Very. Annoying. 
So first you cut off the ends
..and then slice down the side of the fruit. Just peel the skin right off. 

As you can see, there are a ton of little seeds inside.
The seeds are okay to eat, but they're a little too hard to bite for my liking. 
Supposedly this fruit is supposed to taste like bubblegum and watermelon. Though it's not super flavorful, it definitely does have a hint of watermelon to it. Since it was kind of boring to eat though, and there were waaaay to many seeds to avoid, I ended up putting it in the blender and turning it into juice. I mixed it with berry lemonade to make it less thick, and then used a sieve to filter out the seeds and extra pulp. 

It wasn't bad as a juice
My mom and I did decide though that what it really needed was to have some Sprite mixed in. That would have made a pretty darn good drink. 

In the end though, after trying all of these new things, I finished up with a nice, normal, familiar Kiwi.

Yum..

Thursday, February 21, 2013

Ready for Friday...

It's been a weird week...not very weird...but weird enough..

I've hardly had any human contact outside of work, and I've had nothing but human contact at work. It's February break, so all the kids are out of school for a week...the hotel I work in has a water park in it so you can only imagine how busy we are.

My fairly strict boss pulled me aside for what I thought was going to be a serious conversation when in reality he just wanted me to tell him whether or not he smelled like Indian food.

I bought a 4 lb container of potato salad...not to share with anyone...just for myself. The cashier made me promise not to eat it all in one sitting. 

My computer has been having trouble loading videos, so instead of watching shows like I usually do in the evening, I made this giant bowl of mac and cheese, 

and put together a ton of funny little bracelets out of metal nuts. 

I found a tin of them in the shed...
I made some silver ones, and then painted some of them gold because I thought it would go better with the string that I had...plus I'm kind of into gold right now.
and then I just braided some string together, and braided the nuts right into the middle of the braid. 
The End.

Also, I cut my hair.

Monday, February 18, 2013

DIY: Knotted Headband

I've been in a really crafty mood lately, so I'll probably be posting a lot of DIYs. This is one I saw a while ago, and thought was very cute, so I decided to try it.

                                                     DIY: Knotted Headband

I was originally planning on doing a prettier color, but I decided on black since I'm not allowed to wear bright colors at work. I can always make some more colorful ones later.

Step 1: Start with a tee-shirt, or sweater or some sort of cloth that has a little bit of stretch to it. I chose a tee-shirt, just because I had an extra lying around.
Step 2: Cut off the bottom seam. You don't want this part to be in your headband.
Step 3: Measure about 5 inches from the bottom of the shirt. Mark it with a pencil, or chalk (whatever will show up on your fabric) and then cut along the dotted line.

Step 4: Measure the cloth around your head so you know where to make the first knot.

Step 5: Then just keep knotting until you've run out of the extra cloth. Make sure to make the last knot really really tight, and then cut off the excess.

All done! Easy peasy right?


Sunday, February 17, 2013

If I had three wishes...

Brandon and I were talking about this a couple of days ago, and this is what I concluded..

                                                         Three Wishes
1. To be successful in my career (Wedding Planning obviously)
My real goal is to work for a planning agency, but have an office at home and only go into work 2 or 3 times a week for meetings and stuff.

2. To always have enough money to cover all of my standard bills (heat, water, electric, etc.) This way I won't become a bad person by wishing to have unending amounts of money, BUT I will be able to keep all of the money I earn from working on things that I want instead of only on things I need.
Then I could afford to buy a new computer so that I wouldn't have to pause between every sentence to wait for my laptop screen to stop doing this...


3. To be able to teleport from any point to another, at any time, in a matter of seconds.
This would pretty much eliminate the constant driving that I do, and seriously, how cool would it be?


Friday, February 15, 2013

Valentine Gift DIY

So let's start with a disclaimer...
You may not know this about me, but in almost every circumstance, no matter what, I always do something wrong. Usually not horribly wrong...just slightly wrong, in a way that makes people shake their heads and feel a little sorry for me.

As an example:
This is a lovely rose that someone at work gave me for Valentine's day.

Here is that same rose after I set it on my dashboard and my heater fried it.

Not a completely horrible mistake...just a little tragic...and a perfect example of how I mess up everything a little bit.

So with that disclaimer in mind, here is a tutorial on the (slightly cheesy) Valentine's day gift that I made for my boyfriend.

52 Things I Love About You

Step 1: Start with an ordinary deck of cards.

Step 2: Using a hole punch, punch two holes in each card. (They're going to fit together like a book)


Step 3: Using some fancy edged scissors, I cut out little squares to be glued to the front of each card.
Step 4: Write one thing that you love about the other person on each paper. (52 things, as there are 52 cards obviously)


Make sure you mix it up. Some of the things I wrote were serious, some were silly, and some of them were even inside jokes that would just sound completely ridiculous to everyone else. You can print these off of the computer if you want, but I chose to hand write them because it's a little more personal...also I'm lazy, and my printer is all the way downstairs.
Step 5: Glue one paper to the front of each card. 
(This is the step where my disclaimer comes in)
Take a good look at the photo. Can you see where I went wrong?
Yes. That's right. I glued the papers on upside down. Normally there's no up or down side to cards...but there is if you've already punched the holes in them...and books are supposed to be read with the pages going from left to right. 

So in this case I only noticed after I had already glued together an entire suit, and the glue was too dry to pull the papers off without ripping the cards...so I just went with it. Brandon knows me well enough, he should expect that any gift made by me will have something wrong with it. 

And anyway, in some countries books are read with the pages going from right to left (she said to make herself feel like less of a failure)

Step 6: So after gluing on all of the "reasons I love you" just take some book rings and hook all of the cards together. You can do the cards in order or randomly it doesn't matter.

I used the Jokers for the front and back covers. 

So there you have it.
Other than the slight mishap with the book turning out backwards, I don't think it turned out too bad as a last minute gift. 
I didn't even have to spend any money on it.

The End

P.S. Maybe some day I'll keep my word and actually catch up on that photo challenge (honestly though, don't hold your breath)


Monday, February 11, 2013

                                Day 11: Transportation

 I know it's cliche, but books have taken me to more places than cars or trains ever could.


Sunday, February 10, 2013

Liar Liar, Pants on Fire...

I know I said it would be one a day...so I guess I'm playing catch up again...

                               Day 8: In My Hand

Day 9: Comfort

Day 10: Up
(Stretching this one a little. lol. This kitty just woke "up")
Look at his sleepy little face!


Thursday, February 7, 2013

Wednesday, February 6, 2013

Last day..

My last day of work was nice. The calls weren't too horrible, and my supervisor bought me a cookie cake and let us sign out of the phones a little early to enjoy it. And after work a couple of my co-workers came out with me for some fries, and a fun goodbye. I'm glad to see that everyone is going to miss me. I'll definitely miss my co-workers. Honestly, part of me will miss my job as well. Definitely not being on the phones all day. That's something I can live without for sure. But I really do enjoy being good at my job, and this job was something I was really good at.
That's okay though..I'm sure I'll get really good at my new job too, once I get used to it. Not to mention, I'm excited about my new (more flexible) hours. I can't wait to have at least a little bit of my life back.

So on that note, here is my photo for today.

                               Day 6: A Challenge

Taking care of so many adorable kittens

Tuesday, February 5, 2013

Solar Powered

Tomorrow is my last day as an insurance agent. I used up all of my left over vacation time today, and took the day off, which was really nice considering between my two jobs, I've been working 7 days a week for the past two weeks.
So I spent my day at home hanging out with my kitties, and Riley, and then in the evening my mom, brother, uncle and I met at my grandma's restaurant (The D&R Depot) for dinner. I had a lovely chicken caesar salad (I point this out because it's the ONLY healthy thing I've eaten in weeks #FitnessUpdate)
After dinner we went to a solar energy seminar which provided information on using solar panels to produce electricity in both residential and commercial settings.
It may sound boring, but I found it to be very interesting. It's something that we're looking into putting in at the Old House, so I'm trying to get as much information about it as possible.
We actually have someone coming out tomorrow to give us an assessment.


                                 Day 5: Self-Portrait

Monday, February 4, 2013

Failure...

As you may have noticed, my recently started "photo-a-day" challenge actually turned into one photo...one time...on a day.
What you don't know though, is that I've been taking photos...and then just not posting them...which sort of defeats the purpose. So I'm going to play catch up, and hopefully after today I will legitimately post a photo a day for the rest of the challenge. So here we are...

                                    Day 2: Angle 

Day 3: A Game

Day 4: A Routine

Okay...now I promise from now on, it'll be one a day...for sure.


Saturday, February 2, 2013

February Photo Challenge

I will be participating in the following photo-a-day challenge. I've been a little lazy with my photography, so this will make sure that I'm taking at least one photo a day for a month. I've done a similar challenge before. You can check out the photos from that one HERE if you're interested. 

So here are the goals for each day. 


I'm starting a day late, so on one of these days (not sure which yet) there will be a surprise second photo. 
So let's start off at the beginning.

Day 1: Vintage